Monday, 6 August 2012

Upstairs Bathroom Make-Over December 2011


The kids' bathroom make-over!


There really wasn't anything wrong with the kids' bathroom upstairs, except that they would not use it after we remodelled the main bathroom!! It was driving me crazy, so I took my daughter shopping to pick out decor that was more kid friendly.  I did not want to sink much money into this, so it was to be done on a limited budget.  The tiles had to stay, but were a neutral beige kind of a colour that we were able to work with.  We started by picking out a new shower curtain and then built the palette from there.  I am quite pleased with the results and the best part is, the kids use it!!

Okay, I forgot to take BEFORE pictures, but in all honesty it didn't look much better than this.  There was a vent/fan in the middle of the wall, a towel bar below and a plain white waffle type fabric shower curtain.  The bathroom is very small and the vanity that was in there was poorly installed, so water ran down behind it and b/w the tub and sink all the time.  It was pretty yucky!!


BEFORE:
The bathroom was dark and certainly not very fun!


AFTER:
It truly is quite amazing to see what a coat of paint and little creativity can do!!  My daughter picked out this colourful curtain (that I loved as well) and this became the inspiration for the room.  My husband installed a pedestal sink which worked much better in the space.  The vent/fan is still there, but doesn't seem so bad against the blue walls.  I had the shelf above the toilet in the basement, so just had to give it some fresh paint.  I bought a cheap canvas at Jysk and made a simple piece of art for the room.


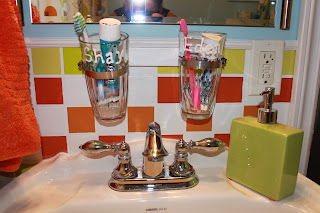
I got some great ideas from Pinterest for both the toothpaste holders and the backsplash.  I  used cheap pipe clamps to hold dollar store glasses that I had personalized with my kids' names.  The backsplash was done by taping off squares, adding a plaster layer, painting the "tiles", removing the tape and then urethaning.  They turned out great!

My Daughter's Room

It is funny!  We designed this room when my daughter was only 4 and she still loves it!  It was lots of work, so hopefully we won't need to update it for a while yet.  Our daughter was lucky to end up with the largest bedroom in the house, complete with a walk-in closet!

Arts and Crafts Nook with bench storage
The antique vanity matches the dresser in the top picture.  I bought the set for very cheap and painted them both out white.  The blue walls are actually a translucent colour wash of blue over white walls.  You can see the walk-in closet in the back ground.
The inspiration for the hand painted mural on her wall was taken from the throw cushion on her bed.  The little cabinet on the right is a cheap Walmart cabinet that was painted to match her room.

Despite the fact that we live in a 1921 home, we knew that there was no hardwood flooring beneath the 70's carpet.  We  bought cheap oriented strand board (particle board) and laid the 4 X 8 sheets on the entire second floor.  My husband sanded them down to a beautiful blond colour and put on several coats of urethane.  I absolutely love the textured look and we are not concerned about the wear and tear of the kids on the floors.  My son even plays floor hockey in the oversized landing area!  The entire second story floor was done for under $700 including wood, machine rentals, urethane, etc.  Love the look!

As I said, there were no hardwood floors upstairs and the stairs themselves were made of nothing more than cheap plywood.  Although I would love to replace them someday, for now, they have been painted out and urethaned for durability.  I got the idea for the "Crap Baskets" from "Sew Many Ways" on pinterest.  Thanks!!  http://sewmanyways.blogspot.ca/2012/06/tool-time-tuesdaycrap-basket-update.html
The baskets were purchased at Dollarama for $2 each and then I added little tags for the kids.  I have to say I absolutely love these.  There were always little piles of things on the stairs waiting to be taken up, but now the kids are trained to empty their basket and return it to the stairs each day.  Love, love, love this idea!!

Winnipeg Jets Birthday Party

Our son Shay loved hockey long before the return of the Winnipeg Jets, but having our own NHL team back in town took us from the "Star Wars" phase to "all about hockey" real quick.  He was determined to have a Jets party.
Having both a daughter and a son, I must admit that I learned very early that boys parties seem to be better handled when there is an activity focus for the party (and preferably not in my home.)  I was one of those mom's who was strictly interested in doing at home birthday parties, until I discovered how much easier a destination birthday is (especially for very active boys).    That being said, we were able to rent a newly built community centre in our area for $85.  This included the 2 hour party plus an extra half hour for set-up.  It had kitchen facilities and was perfect for this type of a party.


Invitation:
For the invitation, I created a document using "Smilebox" and emailed it out to all of his friends.  I used a template for a "Sports Illustrated" Magazine cover and imported a black and white close-up picture of my son that extended the entire magazine cover.  There was a small red band diagonally across the top right corner that said "There's no defence against what is coming…", issue date was that of his birthday month, the heading said "Shay turns 8!" and the column outlining the magazine details along the side read:  "It's game on!  Top shelf, short side, slap shots too, backhand or five hole, stick handle through!  Come "lace-up" for a game of floor hockey @ _____________.  Game time:  the date  Puck Drops: start time for party  Final Whistle:  end time for party

Loot Bags:
I bought small red gift bags from Dollarama and made skates to decorate the outside of the bag.  The loot consisted of a homemade Jets jersey sugar cookie, a Hockey News book from Scholastic, a homemade hockey bookmark that said "We Jets love to read!", a hockey pencil and ruler, a Stanley Cup sharpener and of course,  a "Skor" chocolate bar.

Decorations:
I didn't do much as we were not having the party at home and didn't have much time to set everything up.  I purchased a little triangle banner for the cake/loot table, made a hockey ice table cloth for the kids' table and a birthday banner for Shay.  I also bought navy blue cups and put the kids' last names on the cups along with the number of a Jets' player.  The boys thought this was cool.  We had the room set-up with benches turned on their sides to act as the boards around the play area.

I had planned to serve pizza, but the oven was not working, so we just skipped it.  The boys were so engrossed in their hockey game, that they didn't even really want to stop for snacks, cake and to open gifts.  The party was very easy to manage and the boys had a great time.

Loot bags and cake were on this table.


You can see the labelled cups in this photo.


The community club provided all of the sticks, puck, nets, etc.

Bookmark from loot bag

Homemade Winnipeg Jets Cake

Homemade retro jersey cookies

Friday, 3 August 2012

Front Entrance Make-Over


Our kids were away to camp last week and my hubby and I were on a mission to get as many projects done as possible.  I worked on my closet make-over as well as a some other smaller projects.  My husband cut, fit and installed 2 antique doors that we bought.

Our home is an Arts and Crafts style home that was built in 1921.  When we purchased the home there was an aluminum screen door on the front which we both hated.  Well, we finally found a door (at The Old House Revival Company) that would fit the oversized opening and my husband installed it.  He sanded it roughly, but we really wanted it to show all of its age and wear, so I just stained over what wasn't sanded off.  We love the finished product and the "slam" of the wood on wood when the door closes takes you back in time.

BEFORE:  with the old aluminum door

AFTER:  with the old screen door we installed


We also have this crazy alcove in our front entry.  The space isn't deep enough to install a closet and did not have a door.  We put hooks up to accommodate the coats, but it was always an eye-sore and over-loaded with backpacks, hats/mittens, etc.  We finally found a door on Kijiji that only needed to be trimmed down slightly to fit the space.  It was quite a bit of work to sand and stain it, but I think the finished result is good.  We are still not sure about the "tin tiles" on the glass.  We may remove them and just leave the existing bevelled glass panes exposed.  The tiles were made using aluminum foil baking sheets and the idea was taken/modified from one I saw on pinterest at http://suzyssitcom.com/2012/06/feature-friday-faux-tin-tiles-tutorial.html

BEFORE:  open alcove with exposed coat storage (this actually looks better than usual as the kids are away at camp and clutter is to a minimum this week!!)

AFTER:  door installed with faux tiles on window panes

Jury is still out on the tiles!
Here is a close-up of the tile.  Once all 9 were made, I distressed them using a combination of brown and white shoe polish.

Tuesday, 31 July 2012

Scrapbooking Room Layout

I am fortunate to have an extra room in my home with a beautiful wall of windows and lots of natural light. The room is about 6' and 9'.   It is always difficult to keep this work space tidy as I nearly always have a project on the go.  This is pretty much as tidy as it gets!


I have my scraps of paper sorted by colour and hanging in ziploc bags below the windows.


The dark blue drawers on the white shelf are just a workshop organizer for  screws , bought from the hardware store.  The large beadboard drawer is actually the drawer that my old ugly melamine desk had.  I loved the feature for storing my Cricut and knew I would really miss the storage and pull-out drawer feature, so we just cut it out of the desk and re-faced/aged it.  The desk was a great find!  I bought this solid oak beauty off Kijiji for $40.  I sanded and stained the top as it was in very bad shape, but didn't touch the long drawer/legs at all.  I love the weathered look.
The cabinet on the left was purchased on Kijiji as well.  It was only $40, but was in really bad shape.  It is not very well made (as I found out later), but it opens up to give me an extra work surface and has cubbies that make great storage.  (The before and after shots are in the furniture make-over section.)


Sleep Over Birthday Party Ideas

I have found that as my kids have gotten older, the parties become much easier as the themes are much less elaborate and they are happy to make their own fun, and thus require less planning.  My daughter did a sleep over theme two years in a row, but only had a "half sleepover for her 8th birthday the girls were picked up late in the evening.)  You will see two sets of pictures as the activities, cakes and decor were a bit different for each party, but I have combined the ideas in the description.

Invitations:
The first invitation was cute.  I stuffed the pillow, so it was actually 3D, although it is hard to tell from the photo.

This invitation came with a paper doll that could slide in and out of the sleeping bag.  She is resting her head on a real mini-pillow.  The girls were told to bring their invitations to the party and they then designed clothes for their doll.  The orange pull tab at the bottom slid out to reveal the party information.  The back of the invitation was made to look like a brochure with details about what the kids would be doing, timelines and a checklist detailing what to bring.

Decorations:
Birthday Banner (I always make one of these to coincide with the theme)
Table Cloth ("dress table to look like a bed")
Set up the living room with lots of pillows and blankets


Activities and Games:
Decorate a Pillow Case with fabric markers
Designer Paper Dolls (handmade to go with the invitations and scrap booking paper for clothes)
Kiss the Prince (Kiss the Poster - blind fold, spin around and girls had to kiss the poster)
Pass the Present (Wrap a small prize/gift in several layers of paper.  Works like musical chairs, but when the music stops, whoever is holding the present gets to unwrap one layer.  Whoever unwraps the final layer gets to keep the gift!)
Watch a movie
Girls were invited to bring their cameras and take lots of fun pictures throughout the activities
Musical Pillows
Foil Fashion Show (split the girls into partners or small groups and give them a roll of cheap tin foil.  Have them design clothes and accessories out of the foil and then get "dressed-up" for a fashion show.  They loved this!)
Twister
Karaoke
Just Dance (Wii)


Loot Bag Ideas: (I usually buy one or two larger items and try to avoid the whole $store/candy loot)
Mini Scrapbook album with embellishments
Glow Sticks
Pillow Case (decorated at the party)
Paper Doll with their own designer clothes
Flashlights/headlamps
Movie Rental or Pass gift card
Bag of Popcorn or microwavable popcorn bag


Food:
Chocolate Fondue (fruit, mini cream puffs, marshmallows, pretzels, etc)
Pizza
Cake and ice cream (of course)
Popcorn, liquorice and grape floats for during the movie
Waffles with White Sauce and berries for breakfast

Pajama Party (8th Birthday)
I just realized that it is hard to find photos without party guests in them!  Here are a few that give a good idea.


Homemade Bunny Slipper Cake


Homemade Sleep Over Cake for 9th Birthday Party.  The headboard was made out of gingerbread cookie and the little flowers on it were candies.  It was lots of work, but turned out well!


Scrapbooking:
I am also a scrapbooker, but wanted to keep my necessary layouts manageable, so that I could stay on top of my must do layouts each year.  I am making keepsake albums for both kids, but keep my layouts to two per year per child.  I do one layout of their year at a glance and one layout of their birthday party.  I do several other layouts as well, but not in their keepsake books.  I have a Christmas album, that I update with one layout per year and have one School Days album where I scrap book school memories including concerts, special events, teachers, field trips, etc.  This gives me a total of 7 "must do" layouts per year and all others are just for fun!  Vacations are compiled into hardcover online photo books that are fast and easy to put together.